-->

Wednesday, January 27, 2010

Clever Craft Storage Ideas

I'm seriously itching to create my own crafting space in the basement, but for now I will continue leaving messes throughout the house, collecting ideas and drooling over stuff like this. Oh how I long to be organized!!

Shoe cubby turned cutting station:


Three ring binder with plastic page protectors - Embellishment Storage!


Toiletry Cabinet


And this one, I LOVE...it's a toilet-paper holder for ribbon storage!  Neato!


Shower Caddy anyone??


I found all of these ideas at BHG.
Want to see more?  Go here.

Tuesday, January 26, 2010

More Valentines Day Decor


Last week I posted several Valentine's Day crafts that I wanted to do from BHG.  I wasn't really digging the ribbon threading on the heart garland so I decided to use some of the ribbon scraps I had in my ribbon box and do something a little different.  (I can't tell you how many times I've considered throwing these scraps out, but just can't bring myself to do it.  I was glad to give them a purpose, although I now have validated my tendency to hold on to EVERYTHING craft related.)

So, all I did here was draw a heart and used it as a template, cut them all out and used my hot glue gun to attach the ribbon.  All that's left is to tie the ribbons!  I found the letter stickers at Target in the dollar spot.  My total cost was about $2.16.  I could have gone all out and used wooden hearts or chipboard and added some elements to the hearts, but I decided to go with quick and simple.


How to tie a scarf

In my blog browsing this morning I ran across another kick bootay blog to bookmark here at New Nostalgia

Back in December, Amy posted this tutorial that I must share!!!

Sunday, January 24, 2010

Projects GALORE

Right now I have 3 craft projects sitting on my dining room table. (I won't even mention the ones brewing in my thoughts)  My 13 year old had an out of town volleyball tournament this weekend, so everything has been on hold.  I was able to take this project with me to work on, and while I did get quite a bit accomplished, I didn't come anywhere near finishing.  It's really turning out well though, and I'm super anxious to finish.

Friday, I was able to sand down the other two projects and they are all ready for paint.   I will more than likely be home again tomorrow (work is ridiculously slow) which means I should be able to finish at least ONE of my projects.  I can't wait to share!!!!

Oh, and lookie here, my tray is on Mod Podge Rocks!

Tuesday, January 19, 2010

Valentines Day Crafts!

Here are a few creations from Better Homes and Gardens that are on my "to do" list.


BHG created theirs from fabric scraps, but I think I'll use some Valentines Scrapbook paper that I already have on hand.   Just add ribbon and attach to the mantle hang from a curtain rod!  How easy is that!


Look familiar?  I can use my new pedestal from my last post and dress it up with a little festive paper and ribbon and be done!  Another quickie.


Hand painted place mats and coasters made with craft foam... The kids will have so much fun making these on a lazy Sunday afternoon.  I can't wait to see their creations!


Check out this simple heart wreath made from card stock and vellum pieces.


Cut a base from card stock.  Cut out different shaped hearts, curl the edges and adhere.  Hang with decorative ribbon.


I found all of these and more here  
at Better Homes and Gardens.
I'm still on the look out for more Valentines Day crafts so if you have any to share, please do!

Monday, January 18, 2010

Thrift Creations

One cheese dome ($2.99 @ Good Will)


Plus one candle holder ($2.00 @ Good Will)


Plus One white dinner plate ($.50 @ Good Will)


Plus a little hot glue action 


= One cute little decor piece!


Photobucket

Saturday, January 16, 2010

Homemade Grommet Top Curtains

I made curtains!!!! I made curtains!!!  This is my very first attempt at curtains, and they turned out so nice!! I had no idea it was this easy.


Here are the before curtains:


And here's the after:


The best part about this project was picking up the fabric at a thrift shop for, get this...$9.00 (that's NINE DOLLARS!).  Yay me!!  They look so nice with my burnt caramel wall, and I just fell in love with the funky design.
I paid more for the grommets than the fabric, imagine that!  (Even with a 50% off coupon)
At Hobby Lobby next to the grommets they have free "how to" flyers, one of which was grommet top curtains.  It broke down how to determine where to place your grommets in a very simple way.  I could have figured it out on my own, yes, but the simplicity of filling in the blanks with your measurements was so nice!
My only setback was that I had JUST enough material.  Any less and these curtains would have been throw pillows and place mats.  If you look hard enough (please don't), you'll be able to see that I had to drop the curtain rod about 6 inches, which took a bit of time and some touch up paint.


I cannot WAIT to make more curtains with my own two hands, what a feeling of accomplishment!

Wednesday, January 13, 2010

Inspiration, sweet, sweet inspiration


I just found some fun inspiration at The Land of Nod. I had already planned on doing this with Alex's name, but wasn't sure how I was going to hang the letters on the wall. I LOVE this idea of threading them with an antiqued shoelace! So cute and easy and I can do it for MUCH cheaper than $2.95/ letter!
Isn't this just precious!!


I would love to do this in a corner of the Kids Den.  How simple is that!


Tuesday, January 12, 2010

Thrift shop frames


I spied these hideous frames at a local thrift shop over the holidays and immediately snatched them up. I'm certain that if anyone saw how quickly and happily I snatched them up, they were questioning my sanity. That's ok, I knew they could be saved.

(The napkins were another find that made it in to the picture...Pier 1 sale less than a buck a piece)

A little bit of spray paint, some scrapbooking paper, some hot glue, ribbon and a couple of skeleton keys later, and my new shelf has company!


Winning Stick

So I've had a lot of spare time on my hands lately.  A LOT.  Work has been extremely slow, which means I've been home during the day sans the kiddos.  I have had no trouble keeping myself busy, that's for sure.  Not only have I had time to do some crafts, I've also had time to read other blogs and work on some new blog layouts.  I am REALLY enjoying this being at home stuff.

I ran across an awesome idea on Modge Podge Rocks today.  Lori, from Designing Moms came up with what she calls the "winning stick". See her post here.

This is such an awesome positive feedback system for kiddos.  If there's one thing I love more than a handy tip for getting kids to follow through, it's a crafty tip!  This was certainly a soul snack for me today. (scroll down for pics)

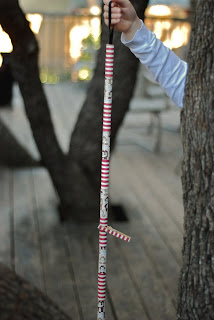
It's basically a stick (I used a left over piece of trim from the bathroom shelf makeover) with different patterned paper to dileneate levels and a clothes pin to move up or down based on behavior.  I love the idea of Alex having to physically move his clip himself.  I know this  has to help things sink in a bit.

The only thing I did different was that I didn't paint the stick.  I was ready for a some instant gratification and had no time for paint drying. :)  Instead, I picked two sheets of scrapbook paper that I had on hand.  I used mod podge to adhere the paper to the stick and then stapled both ends of the ribbon at the top before mod podging that last strip on the wood.  It was so easy and I am so, so anxious to introduce it to Alex!

I'm still trying to come up with guidelines for how this will work for us.  I think we'll start with his clip in the middle and when he doesn't do something we've asked him to do (which is very regular these days) we'll ask him to move his clip down.  When we catch him doing something the first time we ask, we'll ask him to move it up.  If he reaches the top there will be a reward of some sort...still working on that.

And here's Alex's new "winning stick" (Thanks Lori!)


Sunday, January 10, 2010

Mod Podge Tray

I found this looovely tray at Goodwill for $3.99 and could not pass it up.  I had no idea what its future held, but I knew it had something to do with mod podge.  


I REALLLLY wanted to tile it with some glass tiles I found at Home Depot, but unfortunately, they didn't have enough in stock, and I wasn't willing to wait.  I may end up going back for the glass tiles when they get more in stock and using them for another project because I just love them so, but for now I decided to just go with some paper and some mod podge (are you suprised?).

I haven't sealed it yet.  Something tells me I'm not quite done with it yet.  I'm not sure what else there is to be done, but there's something.  It will come to me in time.


A painted mantle

It's only a drop in the bucket, I know, but I am very happy with being one step closer to getting rid of all the red/honey oak in this house. Baby steps.

Mantle before


Mantle after


Thursday, January 7, 2010

Repurposed Christmas Tin

As I was de-Christmasing this past Sunday, I decided to downsize my Christmas stash and get rid of those items that never seem to make it out of the storage bin. You know, the ones that just don't quite cut it anymore that you continue to pack up every year? I'm notorious for holding on to things because I just *know* if I pack it up, I'll end up having a need for it someday. So, back to decluttering...I came across this tin that almost made it to the donation pile and I decided to put it on my desk, and if I came up with an idea for it before it got in my way, well great, if not, it was out the door.

Here she is before:


I decided to do something quick, simple and functional with items I already had on hand. I wrapped it in scrapbook paper and finished of the edge with the polka dot ribbon. It still needed some thing, so I tied up some ribbon, hot glued the jewel in the middle and voila, about half an hour later I have a new place to put my stack of bills! I'll probably end up Mod Podging it, but for now, I don't have a Christmas tin on my desk staring me down.


Shhh, don't tell anyone about the bottom.


Go see more transformations at The Shabby Chic Cottage

Wednesday, January 6, 2010

MUST . STOP . SHOPPING

I can't stop shopping! I don't know what it is, maybe a craving for crafting or has Christmas Shopping made an addict out of me? In the past three days, I have been to the following stores: Hobby Lobby, Kirklands, TJ Max, Target, Pier One, Walgreens, Habitat for Humanity Re-store, Goodwill, and the Caring Place (a local thrift shop). The good news is, I have showed major restraint and found some fab deals. I ran in to Target to pick up a few necessities and was drawn to the Christmas Sale. 90 percent off was waaay too good to pass up, so I picked up a few little things.


See that huge container of ornaments? Original price $15.00. Jamie's price $1.50. I picked up 2. No, I don't NEED the ornaments, but I did HAVE to HAVE them. I just recently read a post from Eddie Ross about this adorable ornament wreath and I wanted oh so badly to make one, but really just couldn't see myself shelling out the $15 it would take to create it with all of the gift shopping I still needed to do.

The smaller ornaments in the star container were normally $5.00 marked down to $.50. I picked up two. I figure I'll follow the same method for the large ornament wreath, but make a couple smaller ones for around the house.


I also picked up a spool of curling ribbon for $.29, 5 rolls of wrapping paper...the pricey roll was $.49, the others were $.30 and $.19. The best part...I actually needed wrapping paper!!!

----Total price $6.55.
----Total savings $54.90!